As we all know, LCD displays are difficult to see in bright daylight, and even harder to see if you're wearing polarized shades. The Rosen GM1210, which is what I have, is widely considered to be among the worst in this regard. Furthermore, the slight upward tilt of the display when any unit is mounted in the dash of a Gen8 Impala only aggravates the problem. Even the EL display of the OEM head unit was practically illegible during the day when the sun was coming from certain directions, and my 1210 became essentially a slate gray sheet in the middle of the dash.
But take heart! There IS a cure! It's the DayVue anti-glare film from NuShield. I've tried several different brands of films in the past, including Zagg, ScreenGuard, and ViewGuard, as well as a few of the inexpensive Chinese offerings. I even tried a couple of the glass offerings. They all performed about the same. That is to say disappointingly. And most fuzzed up the images and icons on the screen to boot.
But I was desperate to make some kind of improvement, however slight, in the daytime viewability of my 1210, so I went searching for something else that might work. After reading the propaganda on the NuShield website and several user reviews, I decided on a DayVue overlay for my Rosen. The NuShield website lists several Rosen models, but not the GM1210. However, a little more poking around revealed that the Rosen CS-MUST10-US model, which is listed, has the same screen size as the GM1210, so I ordered one of those.
The film arrived yesterday, and I applied it after I got home from work. This morning was overcast, so I couldn't tell just how much of an improvement the film had made. But I had some idea, because there's about a 1/16" gap between the film and the edge of the screen all the way around, and the difference in contrast between the two areas was readily apparent. Also, I noticed that the screen wasn't darkened by my polarized shades the way it had been without the film.
The clouds had cleared, and I was in bright sunshine during the drive home. Exactly the same driving conditions that had previously resulted in my display turning into a sheet of gray. But not this time. The screen was easy to see, even with my polarized shades, and I was grinning ear to ear all the way home. I had the rear view camera displayed most of the way, the image was sharp and clear. I honestly think it was much sharper than it had been without the film.
This DayVue film is so phenomenal that I ordered some to replace the Zagg film on the display in my weekend car as soon as I got home. The only downside to DayVue is its price. It was $18 plus shipping for each car, but having experienced how incredible it is, I consider it eighteen bucks VERY well spent.
Just passing this along for any of you who would like to see your in-dash displays more clearly. And who wouldn't? I have no dog in this fight. I'm not in any way associated the the folks at NuShield, and will not receive any sort of kickback or discount for this endorsement. I just like people to know when I've found an exceptional product.
Incidentally, NuShield is located in Pennsylvania. There seem to be a lot of good folks there.
There’s absolutely no discernable difference in the Rosen’s touchscreen sensitivity, which by the way is much better than the head unit in my weekend car. The Rosen is so much more sensitive than my other unit that I honestly thought it was C/D, rather than resistive.
I wouldn’t recommend buying a larger size film and cutting it down to exactly fit the screen all the way to the bezel. Films are always cut to leave a tiny gap all around for a few different reasons. First, the film will want to lift along any edge that actually touches the bezel. Second, the gaps provide escape routes for any tiny bubbles that may have been trapped during installation. And third, if the film ever becomes damaged or wears out and you want to replace it, you’ll play hell lifting it off the screen without an edge to get your fingernail underneath.
The little gap doesn’t really detract from the screen image anyway, and you’ll just think of it as a “virtual bezel” around the viewing area after a day or two. Just ensure that the film is square on the screen and the gap is even all the way around. This may require removing and reapplying the film more than once, but it’s worth the effort, because it will drive you crazy if it isn’t square and even all the way around. Well, it would drive me crazy, anyway.
Fortunately, removing and reapplying DayVue is very easy and doesn't hurt the film. Some films I’ve tried were very difficult to pull back up after being laid on the screen, and the extremely thin (cheap) ones are basically throwaways if you need to pull them up, because they tend to develop creases. The DayVue film is nice and thick, with no tendency to crease if you need to pull it off. Ask me how I know. :)
The thin protective sheets on both the front and back of the film have pull tabs that are labeled to differentiate the front of the film from the back. It may not matter, but I also made sure to install my film with the text on the tab for the front sheet right side up. This placed the pull tab in the lower left of the film after it was installed.
After thoroughly cleaning the screen (I bought the cleaning kit offered for an extra two bucks and strongly recommend this small investment, because it includes a nice, really soft cloth that can be used in the future to wipe away fingerprints that may accumulate), just pull the protective sheet off the back of the film and gently roll the film onto the screen horizontally from one side to the other. Being a lefty, I started at the right and worked left, but the opposite direction will probably feel more natural for righties.
If any large air bubbles become trapped as you’re rolling the film onto the screen, just pull the film back again and work them out by rubbing your finger up and down over the film as you lay it on the screen. Be sure not to leave any the large air bubbles during the installation, because big ones may not work themselves out and will be annoyingly visible when the screen is backlit.
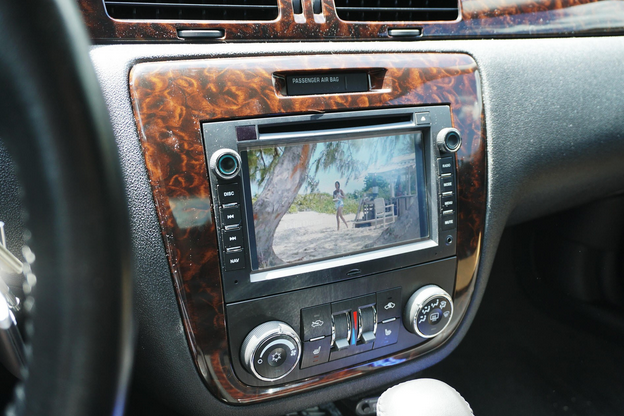
Here's a photo taken in bright sunlight of a 720x480 MP4 video image on the Rosen 1210 screen. Sorry, this SD card has only Johnny Worricker Trilogy videos on it, which are all 720x480.) The photo was shot from the driver's point of view from behind the wheel, rather than straight on, because this angle produces more washout.