This is a review and installation of the Kicker Key 180.4 Smart Key Amplifier and John Adams, Audio Wiring Harness Maker extraordinaire! John is an amazing guy and really talented. He made this installation a breeze. The harness that he fabricated for me is as good as, if not better than any OEM harness in the truck. Here's the links to his YouTube Channel (https://www.youtube.com/watch?v=7jzJhbf ... e=youtu.be).
A little history: My 2015 Silverado has the non-Bose audio system. I used it for about a year and a half, and it was adequate, but the stock speakers distorted at higher volumes. Part of the problem is that I'm about 60% deaf in my right ear, and although I can hear well enough, certain speaker distortions played tricks on my hearing, especially in that ear.
In February, I decided to upgrade the speakers. Nothing fancy. I put Pioneer TS-G690s in the front doors, Pioneer TS-G650s in the rear doors, and Kenwood Excelon KFC-X2Cs in the dashboard corners. The sound was much, much improved, even at higher volumes. Fast forward a couple of months, and I discovered "podcasts," which I listen to thru Android Auto.
Podcasts are great, but they broadcast at significantly lower volume then say, XM, so I started looking at amplification. I'm no audiophile, and I was not interested in any expensive "over the top" system with a subwoofer, huge enclosures, and lots of amplification and additional wiring.
I started reading reviews on the Kicker Key 180.4, and I concurrently found John Adams in a post on the SilveradoSierra site. John is essentially the "Phil Gamboa" of audio wiring, and I'm overjoyed to have found him. He provided me with the Key Amplifier and the "patch harness" turn-key, ready to go. All I had to do was install, and "plug and play." (His part number appears to be: NBFSIH2-MOD.) Communicated with him on a Monday, paid via PayPal, he shipped Friday, and I had it the following Monday.
I knew that I wanted to install the Key Amplifier somewhere accessible, either under a seat, under the center of the dash on the floor, or in some place behind the lower glove box, around or to the right of the cabin air filter access door, but I didn't know exactly where, so I asked John to just fabricate a 36" harness, and any extra I had I would just make a service loop and stow out of the way, perhaps being useful when adjustments needed to be made. John charges "per foot" for anything longer than his basic build.
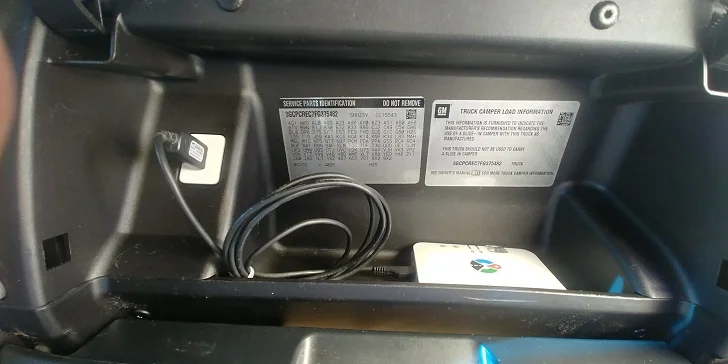
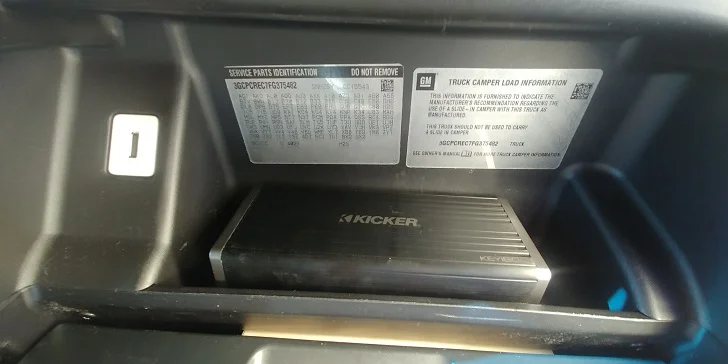
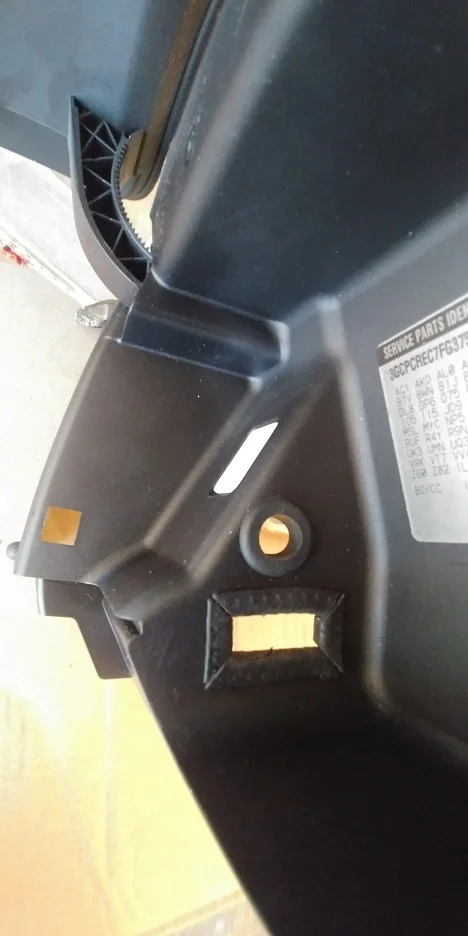
Finally decided on an appropriate place to install the Key Amplifier. It just so happens to fit perfectly in the upper glove box. The upper glove box is more or less useless anyway, and the only things I ever kept in it were my "Mileage-Ace" mileage tracker for business mileage, and a random checkbook from a checking account I almost never use.
First remove the lower glovebox by removing the 4 torx head sheet metal screws. Be careful with the lower one on the left, as its right above a "tray" for the HVAC system, and can easily fall in. After the screws are removed, give it a light "tug" to get it off. There are two screws left that hold the upper glove box in place near the hinges. Remove the screws, close the glovebox door, and give the upper glovebox a little "tug" as well to remove it.
The next task was to cut the holes in the left side of the glovebox for the wiring harness(es.) If you undertake this, the Key Amplifier should be positioned with the smaller harness connector to the right, (all the adjustments and dip switches are located on that end,) as that harness is much smaller and easier to make the "loop" and go over the top of the Key Amplifier and exit the left side of the glovebox. Furthermore, if you want to readjust the Key Amplifier for any reason, all you'll have to do is lift it up slightly and rotate it 90 degrees clockwise to access the adustments.
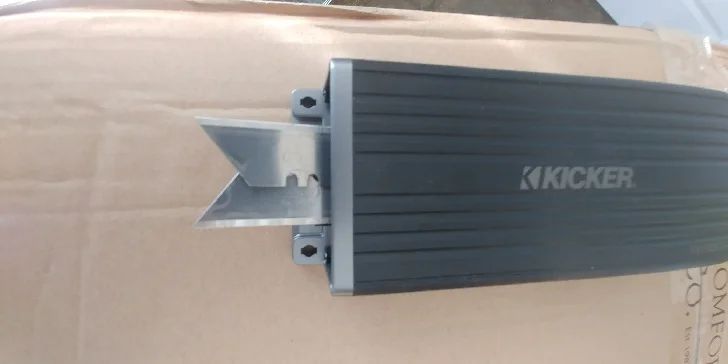
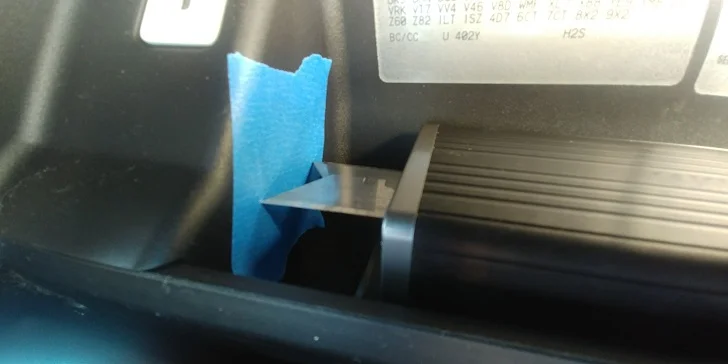
Because of the shape of the upper glovebox and the fact that it narrows slightly to the left, you cannot push the "Key Amplifier" all the way against the left wall of the glovebox in order to "match scribe" or transfer the profile of the large male connector in order to cut the hole for the harness to come through. So, with the glove box still installed, I took 2 utility knife blades, cut them approximately in half, and carefully pushed/wedged them in slightly above the top of the large male connector on the Key Amplifier, with the blade sides facing out, and perfectly lined them up with the outside of the connector.
Then I put a piece of blue tape on the left side wall of the glove box, set the "Key Amplifier" into the glove box and slid it into the left wall. The "points" of the blade pierced the tape and marked the plastic as if it was a "center punch." Then I took a 1/16 drill bit and drilled thru the marks and removed the glove box to finish marking the cutout, and cut both holes. The hole for the large connector is approximately 5/8" X 1 ¼", and easy enough to cut with a utility knife. It's important that this hole is either very accurate, or much larger and ugly, because there is some dashboard support structure right on the other side of the glove box that the harness(es) have to pass thru.
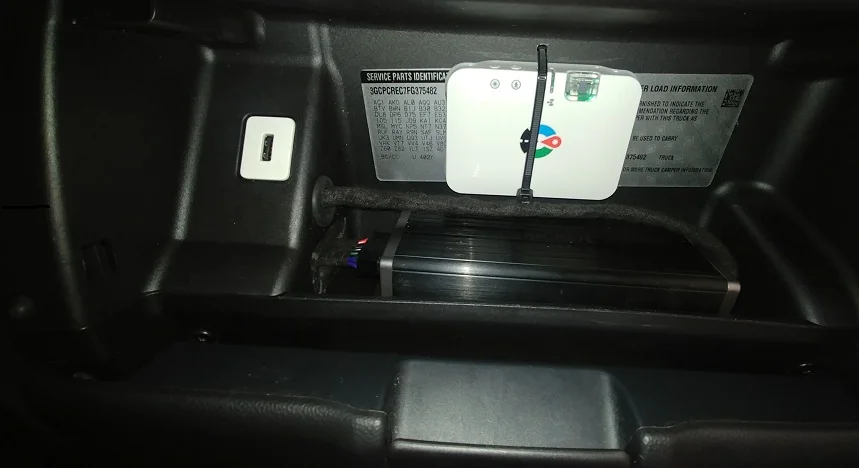
The small hole is 7/8" round, and I used a spade bit, first removing the USB connector entirely from the glove box to avoid any damage from drilling. I installed a rubber grommet in the small hole and some anti-chafe material around the square hole. When the installation was complete I secured the Key Amplifier with Velcro instead of the provided screws.
NOTE FOR INFO: Whenever cutting a square hole in metal or plastic, the corners should always be rounded either by using a file or drill bit. It prevents the corners from cracking out.
Turning to the electrical installation, I decided to tap power from an accessory "lug" on top of the battery. Looking at the battery from the right side of the truck, the first lug on the right is "supplied power" direct from the battery. Second, fourth and fifth lugs were already populated. The third lug was unused until last month when I installed the Amp Power Steps. The lug is rated for 125 Amps. (stamped on the lug itself.)
The Amp Steps require a 30 Amp Fuse, and the Key Amplifier requires 15 Amps, so there is no problem putting both accessories on that lug. The Key Amplifier comes with an in-line fuse holder and the instructions say to install it within 18" of the battery, so I started running wire and did so. I'm a stickler about electrical connections, so I'm using all "aviation grade" Amphenol butt splices and ring terminals, along with the Amphenol ratcheting crimper. Any connections under the hood are also covered in shrink tubing.
It's nearly impossible to run wire thru the firewall on this truck. Even just two 14 gauge wires thru any existing grommets I could find. After trying for about 45 minutes, I ran the two wires in a plastic split wire loom across the firewall where the existing loom(s) were, down the back of the left fenderwell where a large OEM harness and the Amp Step harness already were, and put the wires thru the rubber grommet where the emergency brake cable goes thru. Then under the carpet, up the right "kick panel," and over to the left of the lower glove box, zip tied to dashboard support structure. I also installed the ground wire on top of the large braided ground on the firewall to the left of the motor.
Before reinstalling the upper glove box I guided John's harness thru the dashboard support structure, thru the holes in the left side of the upper glove box, and then installed it. I installed the Key Amplifier and connected both connectors. Now it was time to connect to the radio module. First remove the plastic trim around the Head Unit with the help of a plastic trim removal tool.
Start at the top and work your way around. Once it's free from the dash, disconnect the wiring for the heated seats, (if equipped,) and put the trim somewhere it won't get scratched. Remove the head unit by removing the 4 7MM head sheet metal screws, disconnect the three connectors, and put the head unit aside.
It is also necessary to remove the right AC vent, (held in with 3 7MM head sheet metal screws,) because directly underneath it there is dashboard support structure with only about a 2" square cutout to get the harness through, and there are already harnesses coming thru it. Bring the harness thru the cutout up to the radio module, (top module,) disconnect the green connector, which is the first one from the left, and install John's harness connections.
Zip tie where necessary, and reinstall the vent, head unit and trim. After finalizing the installation, I realized that the 36" of harness I had John fabricate wasn't all that long. Perhaps only 6 or 8 inches too long. I just made a service loop and stowed it out of the way, then reinstalled the lower glove box.
Now it was time to set up the Key Amplifier. I set all the adjustments according to the instructions, which were the "gain" adjustments and "dip switches." Only glitch I had was that in order to hear sound, the "auto turn-on" dip switch had to be in the "DC" position instead of the "12V" position, which the instructions had led me to believe. I then plugged in the microphone, positioned it on top of the driver's headrest, started playing a "Traveling Wilburys" song on CD, pressed the button to start the "get out" countdown, and let the Key Amplifier start it's adjustment process.
You hear all kinds of things happening if you're standing outside the truck, from tones, to the music starting and stopping, to white noise, to different speakers turning on and off. Note: Play a song that takes at least 5 minutes. It takes almost that long for the Key Amplifier to do it's thing. My first setup was a failure. I got the "sad song," and 4 tones, which meant the music wasn't loud enough. Cranked it up to about 80% volume and started the setup again. At just short of 5 minutes in, I got the "happy song," letting me know the setup was successful. I disconnected the microphone.
As I just finished up late yesterday afternoon and the weather was turning cold an drizzling, I haven't had time to optimize the gain adjustments and high-pass filter options, nor have I had time to reset the balance and fade settings on the head unit to my liking, but I will tell y'all that on the 50 minute drive into work this morning that it's a night and day difference.
There was absolutely no distortion at maximum volume. The sound is crisp and clear, (the best non-audiophile description you're going to get from me,) and the price and time to install was worth it in my opinion. I'm happy with this purchase all around.
Story’s Author
 United States of America, Lake Whitney, Texas