This write up covers installing a brake light flashing module, w/o cutting into the brake wire.
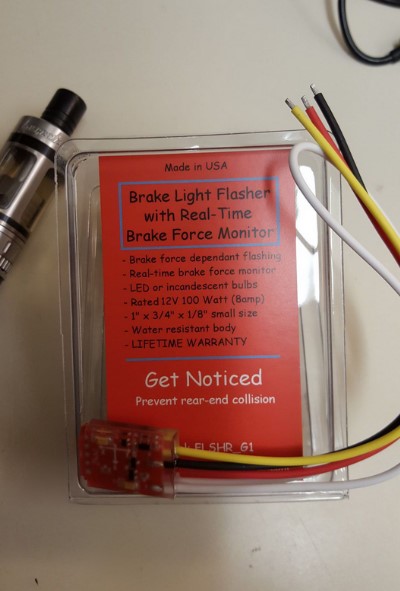
I'm using the "Stop alert flasher with G force sensor" model G1, I bought it direct http://www.3rdbrakeflasher.com... it can also be found at Amazon and ebay.
What is it?:
This brake light flashing module will flash your high mount and or brake lights (depending on instillation) when applied. This model is programmable with many features including panic stop only. It also has an accelerometer that will re activate the flashing module if your already on the brakes and then slow down harder.
Skill level: Novice
Time: 2 hours
Requirements:
Flashing module
ATB fuse holder
Double sided tape
Tact switch (momentary) (optional)
Soldering iron or torch
Solder
Wire strippers
Heat shrink tube
ATB fuse
Plasticweld epoxy putty
Test light or volt meter
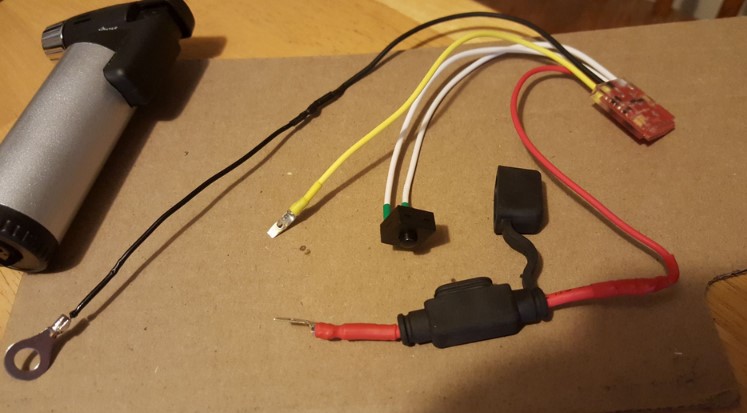
Build the harness:
1. Cut the leads down to about 2" on the ATB fuse holder.
2. Solder one leg of the in feed (red) wire of the flashing module to the ATB fuse holder.
3. Solder a ring terminal to the ground wire.
Don't forget to slide your heat shrink tube on before soldering things up.
4. Prep the ATB fuse. I used a hack saw to cut part of the sheathing away, then finished up with a sharp pocket knife.
5. Solder the remaining leg of the fuse holder to one side of the modified fuse and solder the out feed (yellow) wire from the module to the other leg.
6. Cut the looped white wire (optional for re programming only) and solder in your tact switch.
Your harness should look like this. I tried to use trimmed down spade terminals, they worked in the fuse holder, but not in the trucks fuse block, hence the aforementioned ATB fuse arrangement.
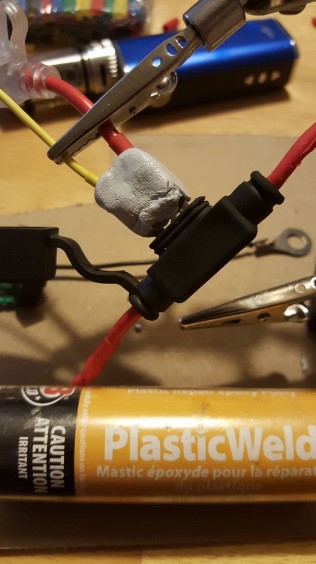
7. Build a fuse body with the Plasticweld epoxy putty, make sure you leave enough of the prong's exposed to plug into the fuse block. Once it's set up in a few hours you can file, sand and shape the putty if you like.
I used a fuse holder to hold the prong's in the proper alignment while the epoxy putty set up.
8. Pull the high mount brake light fuse, located in the end dash side panel, or the brake light fuse if you want your tails to flash.
9. Probe the fuse receptacle with the test light while applying the brakes to find the hot side, it should be towards the back of the truck, at least mine was.
10. Plug your adapted fuse into the fuse block and then re install the 10amp fuse. Make sure the red wire from the module side of the modified fuse goes in the hot side of the fuse block.
11. Using the double sided tape mount the flashing module per Mfg. directions. First clean the module and the mounting surface with rubbing alcohol.

12. Use one of the two dash mounting nuts for the ground wire.
13. Use the tact switch to re program (optional)
Conclusion:
Hopefully having my high mount LED brake lights flash quickly 6 times before going steady will keep some moron from embedding my hitch receiver in his grill.
Disclaimer:
I know this is illegal in some states, so install at your own risk. This model can be programmed to only activate under moderate or panic braking and leave your brake light operating normally under normal braking.
Story’s Author
 United States of America, Washington