It seems a bit late to be doing this on our 2014 Sienna as we enter our forth winter with it but the past couple of days of driving in winter slush has pushed me over the edge. Stopping on long trips in darkness to wipe down headlight lenses with a wet rag in windy, below freezing conditions is not my idea of fun and is becoming less acceptable as the years pass.
So ... today I ordered one of the simpler Hella headlamp washer kits on Amazon Prime Germany. I've bought a lot of stuff from non-US eBay sites but this is the first time I've bought anything from a non-US Amazon site. So far, it's looking almost too good to be true and that I'm going to avoid VAT and U.S. customs and pay less than half what I would pay a direct seller or a seller on eBay Germany.
The kit I bought is the HELLA 8WS 008 549-001 which is commonly installed on non-complying vehicles imported into Europe.
This project "should be" a lot easier if can add a third pump to the existing reservoir per the installation instructions and similar to how it works on other vehicles made by Toyota that have OEM headlamp washers. Otherwise, I'm going to have to source and somehow install a separate washer fluid tank. I don't know if I will do it initially but I also plan to put a switch on the lower left of the dashboard that allows turning off the headlight washers so that they do not always operate when the headlamps are on and the windshield is cleaned.
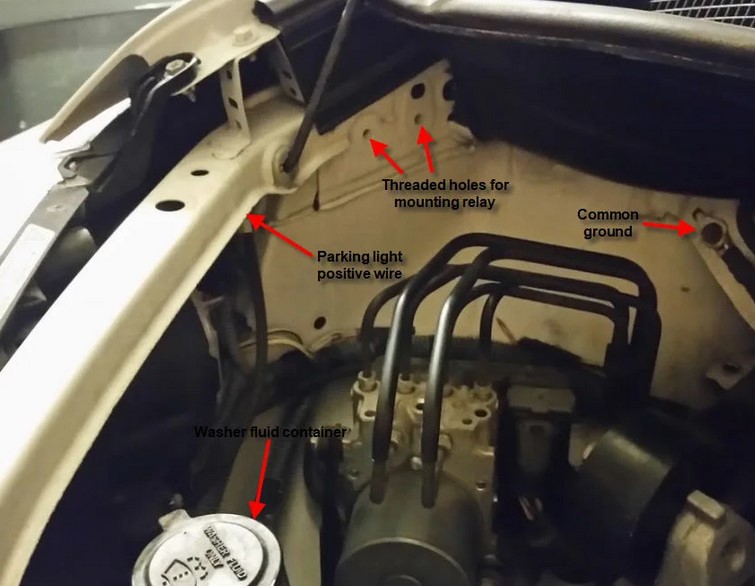
The location of the Hella relay will be barely six inches from the passenger side parking light positive wire I will attach to. Doing this will limit the headlamp washers to function only when the low beam headlamps are on saving washing fluid. I'm going to depart from the installation instructions and splice into the wire between the Hella relay and the parking lamp and run wires to a dashboard mounted switch that allows turning the headlamp washing system off when I don't want it to function when the headlamps are on - largely to conserve washer fluid in warm weather when I'm just trying to clean bugs off the windshield.
I could probably just ground the Hella kit to bolt that is going to hold the Hella relay but there is a robust common ground nearby - might as well use it.
And of course the washer fluid container is conveniently located nearby. Whether I can install the Hella kit's pump into the existing washer fluid container or have to install a separate washer fluid container used only for the headlamp washers is still to be determined - probably after I remove the front bumper cover and take a look. If I can install the Hella pump into the existing washer fluid container, I hope I can do it without having to remove the container from the vehicle. At a minimum, I'll have to siphon all the fluid from the container before drilling the hole for the Hella pump with a 20 mm forstner bit.
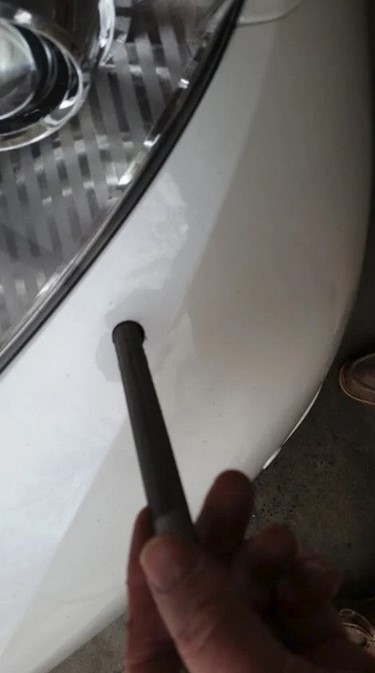
Here I am drilling the larger of the two holes for the driver side nozzle using the 16mm bit after measuring a few hundred times so I don't screw up.
Not shown is the blue painter's tape I had applied to the bumper cover surface for marking on with a pencil or the small pilot hole I punched in the bumper cover with an awl before drilling the 16mm hole. Punching the pilot hole was critical to prevent the drill bit from "walking" across and damaging the surface.
Since I couldn't find an appropriate 17mm drill bit, I then enlarged the 16mm hole to 17mm with a half round file.
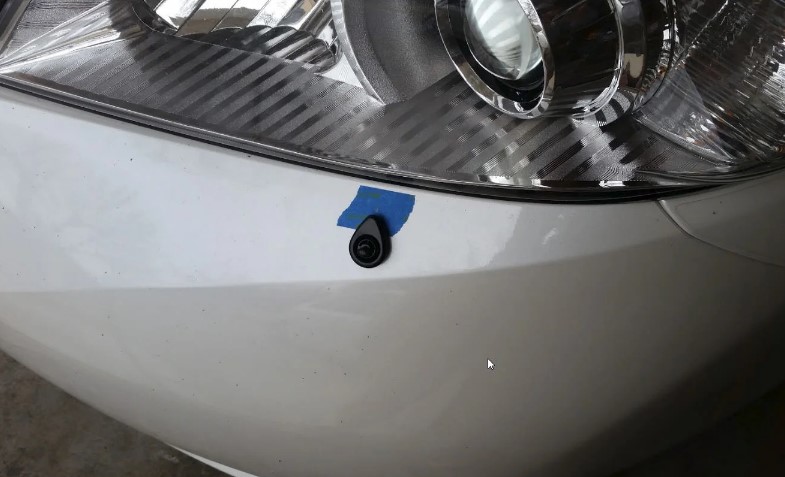
After enlarging the main nozzle hole to 17mm, I pressed the nozzle into the bumper cover so that I could mark where to drill the 4mm hole for the nozzle locator tab (that's what I'm calling it) which assures that the nozzle stays in position and directs the water stream at the headlight lens at a 90 degree angle
The bumper cover is held in place by three larger press-in fasteners in front of the radiator, ten 10mm screw bolts along the bumper cover lip, one phillips screw in each wheel well, one press-in faster in each wheel well. Tabs on the upper edge of the bumper cover outboard of the headlights snap into place.
There is a useful video on YouTube but it probably won't be there for ever:
The video makes removing the bumper cover look a little easier than it is. I found it necessary to pry the bumper cover out where it attaches at the wheel wheels using a screw driver.
Reinstalling the bumper cover is much more tedious than removing it since all portions of the bumper cover have to be aligned at the same time so that it presses/snaps back into place. Be especially careful to not damage the tabs on the edge of the bumper cover outboard of the headlights - when correctly aligned, the tabs will snap into their slots and a mild slap with an open hand.
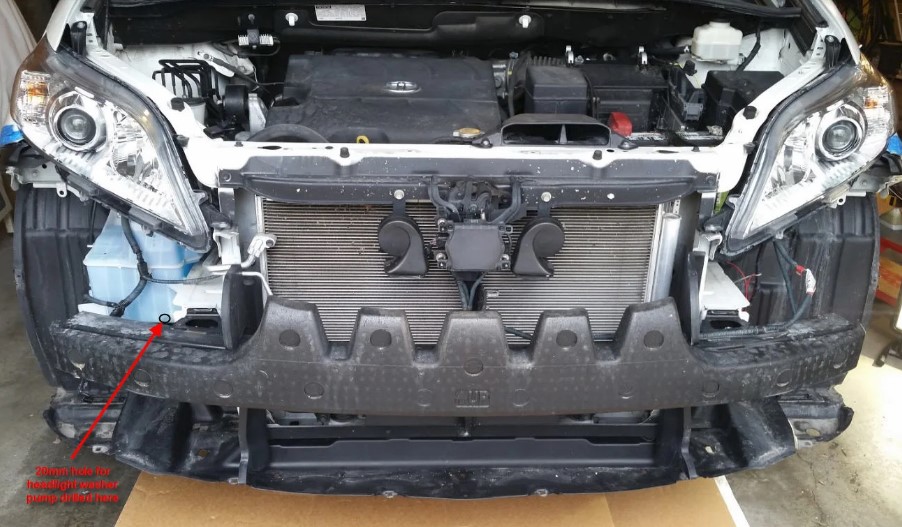
The one photo attached to this post shows where I drilled the 20mm hole in the washer fluid container for the Hella pump grommet. Again, I punched a guide hole with an awl before drilling to keep the 20mm drill bit from "walking". Needless to say, I siphoned out all the washer fluid before drilling.
The washer fluid container is held in place by one nut, one bolt and a plastic cone on the fluid container that slides into the steel sub-frame. I detached the washer fluid container and a friend tilted the front upward while I was drilling the hole. I could have used my 90 degree angle drill attachment but tilting the washer container up made it easier.
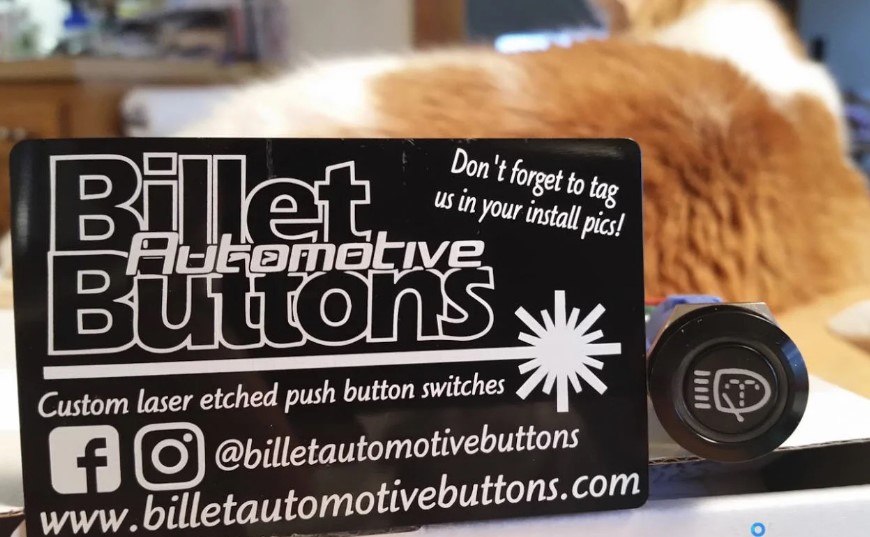
The custom 19mm round momentary headlight washer button arrived today from Billet Buttons in Australia. (Thanks again, sbihue, for telling me about this business!)
The product was extremely well packaged - really "over the top" packaging with the switch, socket and o-ring in a little zip lock bag, wrapped in bubble wrap, inside a corrugated card box which was inside a sturdy shipping envelope. The package included the invoice, a hard plastic credit card size card with very clear wiring instructions on one side and a stick-on advertising graphic like somewhat might stick on a race car body.
I supplied an image of a headlight washer graphic when I ordered the button and told the proprietor in a follow-up email that it was OK with me if he found a better one. I don't know if used my graphic or another one but button face came out what I consider to be perfect - sharp and clear with the image being as large as possible.
I hope to get this button installed soon replacing the similar size Ulincos 19mm round button I'm currently using. I found instructions on a Toyota FJ Cruiser forum on how to wire a lighted button to the dashboard light rheostat. It will be easier if the Sienna has the same wire colors for the button light as the FJ Cruiser but I'm not counting on it. I should be able to identify the rheostat wire colors since all the OEM buttons should have the same rheostat wire colors - it's a process of elimination. The Billet button has a green LED encircling the push button. I would have preferred a back lit button but at least the green LED circle of the Billet Button might somewhat match the color of the existing OEM switch back lights.
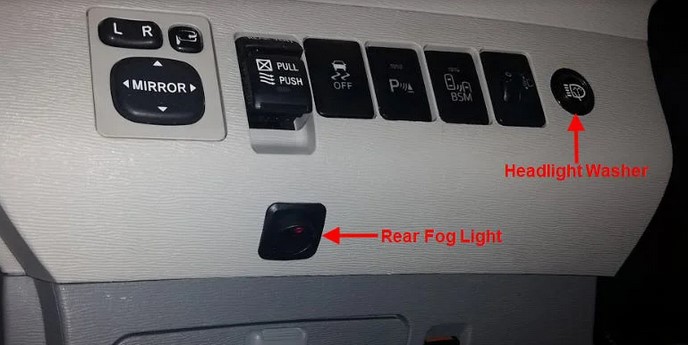
Attached are photos of the custom momentary headlight washer switch from Billet Buttons installed. As I suspected, it is exactly the same switch as one one sold on Amazon.com under the Ulincos brand except that one of the wires on the Billet Buttons socket is a different color. It was easy to just unplug the already wired-in Ulincos socket from the Ulincos switch and plug the socket into the Billet Buttons switch.
I had not wired the Ulincos switch socket into the dashboard light rheostat circuit so I did that today when I installed the Billet Button switch.
It was easy to identify the color of the positive side of the dashboard rheostat circuit since the only wire color common to all switches is GREEN - same color that was said to be the positive on a Tacoma forum.
Identifying the negative side of the rheostat circuit was trickier. Four of the five OEM lighted switches in the panel have a WHITE wire with the rear side window switch being the one that doesn't. Four of the five OEM lighted switches have a WHITE/BLACK STRIPE wire with the BSM switch being the one that doesn't. So ... I threw caution to the wind and touched the negative (black) wire from the Ulincos/Billet Button socket to the pin for the WHITE/BLACK STRIPE wire and then to the pin for the WHITE wire in the back of the socket for the adjacent beam control switch. Bingo! The WHITE wire on the beam control switch turned out to be the negative rheostat wire that causes the OEM switches to dim when the rheostat control switch on the tachometer is turned.
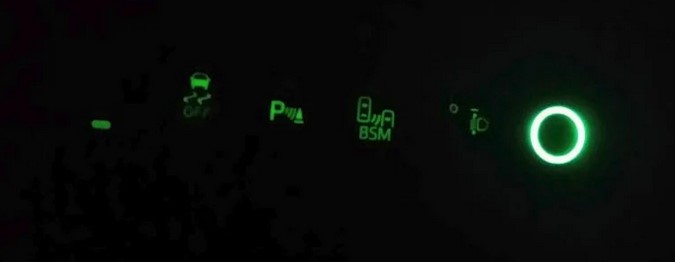
The slightly bad news is that the LED ring in the Billet Button switch does not dim as much as I would like. I had hoped that its light intensity would be similar to the OEM buttons as the rheostat switch is turned through its range. Next time I drive at night, I'll see if the Billet Button switch light level is too bright. It might acceptable while driving at night even though it looks too bright in a totally dark garage. It might also help that the Billet Button switch is hidden from my direct view by the steering wheel hub. I can always disconnect the Billet Button LED from the rheostat circuit if I decide I don't like it.
There should be one or two more posts in this thread before I consider this project complete. Because I'm activating the Hella headlight washers only manually from a switch instead of automatically via a connection to the windshield washers, the amount of washer fluid that will be used for cleaning the headlights should be a lot less. Because less washer fluid will be used, I plan to "T in" the two additional provided washer nozzles so that the high beam headlights will also be cleaned. So ... I'll be removing/reinstalling the front bumper cover again in the next few weeks and drilling holes for the high beam washer nozzles - should take less than one hour.
Edit: It's mid-April 2018 and Winter is "over" disregarding the recent light snowfall. l continue to vacillate on whether or not to install washer nozzles for the high beam headlights. Due to making the headlight washers completely manual instead of linking them to the windshield washers, washing the low beam headlights has used very little fluid due to the powerful blast of fluid produced by the Hella pump and that only the briefest touch of the push button switch is needed. I really like the idea of not having to worry about replenishing washer fluid on long winter trips.
And would having perfectly clean high beam headlights be that important if conditions are bad enough to require washing the low beam headlights? Would I be driving that fast in such poor conditions?
So ... for now I'm going to forget about adding washer nozzles for the high beam headlights. I may feel differently after going through a full Winter with only the low beam washers.
Story’s Author
 United States of America, Kansas