Baking your headlights is an easy process that will need to be done in order to do any serious modifications to the headlights - some examples may be installing strobe lights (police kit), projector retrofit, angel eyes, or simply removing a reflector. However, many people don't do it because they are afraid they will mess up the housing; and rightfully so - the cost of headlight housings can be pretty outrageous. But maybe I can alleviate some fears about baking headlights with this write up.
What you'll need:
- Screwdriver
- Standard size oven or larger
- Gloves (optional)
Step 1:
First, you'll need to remove the front bumper. A write up on this can be found here: https://ownery.com/@apolymoxic...
Step 2:
After the bumper is removed, disconnect the headlights. This step and step 3 can be interchanged - If you cannot disconnect the headlights without removing them, then go ahead and remove the headlights (Step 3)... just becareful to not pull too hard, or pull the lights too far from the car while the headlights are still connected.
Step 3:
Remove the headlight housings. On the top of the headlights, you will see two 10mm bolts. Remove the bolts and the headlights should pull right out.
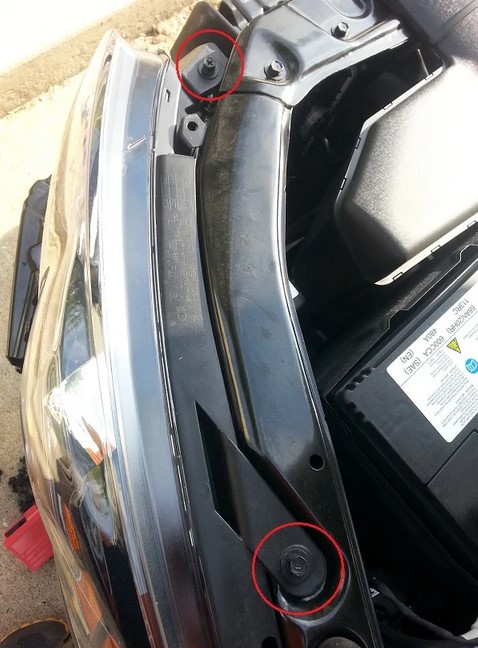
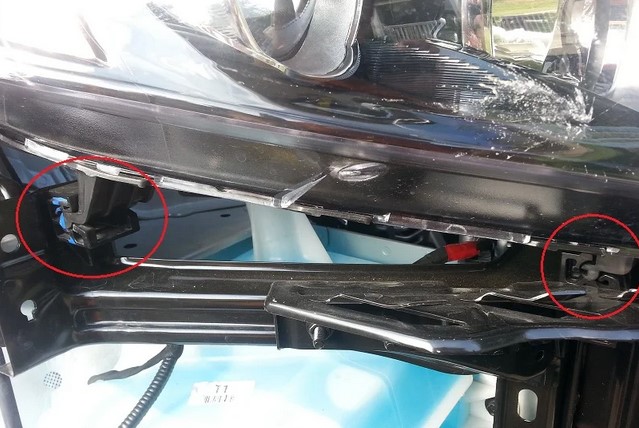
You might have to give it a little tug because the bottom of the housings are held in place by some clips (as shown below). A little tug should easily pull the housings out of these clips.
Step 4:
Remove any removable piece from the housings

Two dust caps (Shown in the top left pic, circled in blue).
All bulbs (Shown in the top left and right pics, circled in red).
NOTE: Be careful to not touch the bulbs themselves... the oil in your fingers can reduce the lifespan of the bulbs).
One rubber vent piece (shown in the bottom left pic).
Two screws (Not pictured... I believe the only screw that needs to be removed is the one on the outer edge, but removing both doesn't hurt).
CAUTION: The two screws referred to look like screws... they do not look like bolts. Do NOT attempt to remove these bolts (shown in the bottom right pic, circled in yellow).
NOTE: These are the only things that should be removed. The connector does not need to be tampered with (it won't come out, even if you try).
Step 5:
Heat oven to 200-225 degrees. Once the oven is heated, place the light in the oven (do one light at a time).
NOTE: Higher temperatures, will require less time the light needs to be in the oven, but as temperature increases, danger of ruining the light also increases.
I recommend 200 degrees for about 15 minutes, but these lights are rather large and might not fit in a standard oven all the way. You can tell from my pics that my lights did not fit all the way. Because of this, I had to leave the door open, which let heat out. So I turned up the heat to about 225 and baked for 15 minutes. You may be able to get away with less time, but the more time you give it, the easier it is to pry apart the lenses.
It's okay if the housing touches the sides of the oven - in fact, in a standard oven, you probably wont be able to prevent this from happening. Just try to not allow any piece to be pressed HARD against a hot surface.
Touching = okay. Mashing = not so okay.
Step 6:
Remove light from oven and pull the lens from the housing. You will first need to lift the tabs around the edges of the lens to make sure it will come off.
CAUTION: You may want to use gloves during this part as the housings will be HOT.
NOTE: You WILL hear cracking and creaking - it will sound like things are breaking - this is normal!
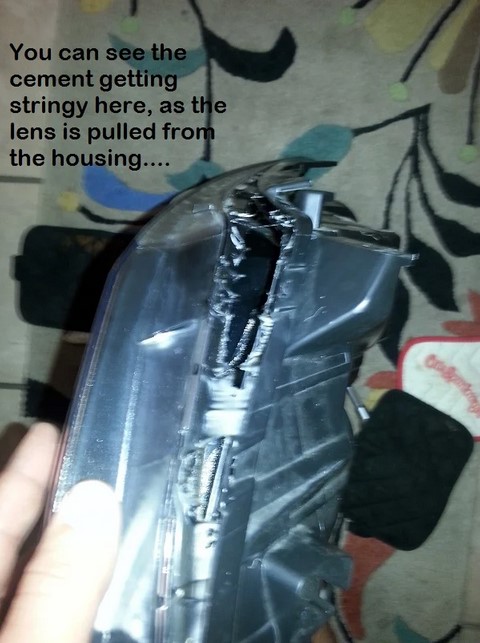
Once you get the lens to start peeling, don't stop. The cement will stretch and string out (kind of like hot cheese on pizza). Cut this "string" or pull it apart and put it back where it came from as best as you can. Try to keep this stuff off of your lens, but if this isn't possible, some goo-gone can remove it.
To replace the lens, put the lens in place and compress as best as you can (without heat). After you are comfortable with the lens placement, put the housing back in the oven for the same duration at the same temperature as before. Remove the housing from the oven and compress again. The lens should slide right back in place. While the plastic is hot, press down the tabs around the lens to keep it in place. Finally, replace all the parts removed from step 4.
Story’s Author
 United States of America, Arkansas