This weekend I installed a Viofo A129 Pro Duo (front 4K, rear 1080P) dashcam into my CX-30 Turbo Premium. There's a lot of good posts on this forum about various dashcams, which helped with my install. However, since this is a very common camera, I figured a detailed setup and gotchas post might prove helpful for anyone else down the line. My car is a US model, so keep that in mind.
I've installed Dash cams before—I put a single Street Guardian in my 2011 Mazda 3 hatch. But doing a dual cam is a much more involved job, and there's a lot more work to do.
These instructions/experience are for the A129 Pro Duo, but they'd work just the same for an A129 Plus Do, A129 Duo, or other similar dual wedge cameras like the Street Guardian duos.
Power Delivery
There's three possible ways to power this camera, and which one you choose can impact the camera's functionality.
Viofo Hardwire Kit. One of the big features of the A129 is its parking mode, but for the automatic low-power mode you need to use the hardwire kit. This kit taps into switched power and constant power, so when you turn the car off, it automatically switches to a low power mode. Unfortunately for us, as detailed in many reddit and forum posts, the interior fusebox supplies constant power at all times. This means the least invasive connection—fuse taps—requires routing wires through the firewall to the engine bay fuse box. If your soldering skills are up to snuff (or you're comfortable with splice taps), you can tap into constant power and switched power wires near the driver's side kick panel. See this post for more info: Jul 11, 2021 If I want to eventually use parking mode, that's probably what I'd do. However, I'm not using parking mode, and that opens up a few more options.
USB Ports. The USB sockets in the center console switch off after a certain period of time after locking the car. The 12V power socket in the console is constant power, so that's a no go for a plug-in USB adapter. I didn't want the camera to keep recording until the car decided to power down the ports, so that left me with...
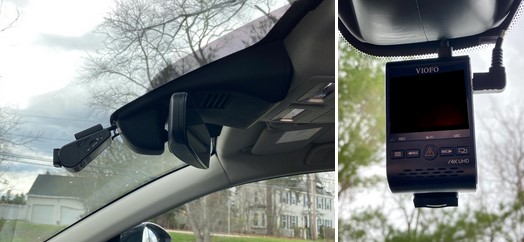
Dongar Mirror Tap. If your car has a frameless auto-dimming mirror (with or without homelink), this is the easiest way to get a clean, stealthy install. This is a plug-n-play wiring adapter that provides a USB connection. The maximum USB power supplied by this adapter is 5V2A (around 10-12 watts). The camera itself draws a lot less power—something like 5V1A when using dual cameras, so it should be a safe draw within that circuit. The auto-dimming mirror circuit is switched with ignition, so it turns on and off with the engine. Accessory mode is not enough to get the camera to run. The downside of this method is no parking mode.
Availability for this adapter seems to be hit or miss. It seems to go out of stock on a regular basis. So if you're interested in using it, you might have to check for restocks.
Note that there is apparently 12V constant and switched power going to the rearview mirror area, so theoretically you could tap the Viofo hardwire kit to those wires. I don't know anyone who has done this, but the main issue is that the mirror housing likely doesn't have enough space to store the voltage regulator that comes with the kit. So while tapping into the mirror for the Viofo haredwire kit is technically possible, I would personally avoid it.
Installing the Dongar Adapter
Opening the mirror housing requires a trim pry tool and a little elbow grease. I started from the front of the housing where the center split meets the seatbelt indicators. Using the tool, I pried at the join until I was able to loosen the guide pins. Then I could work my way down the gap to the first clip. The goal is to separate the two halves horizontally. It'll take more effort than you think, but these are stout panels. You can use your pry tool to lift up the clips that hold the halves togehther and they should pry right out. Use your free hand to pull the left side to the left as you pry through the gap.
After removing the housing, you can remove the mirror by rotating it but that's not wholly necessary for this job. The wiring harness is all the way at the back, and it's secured to the panel by a little rubber stopper. Just pull it out and it'll come loose from the housing. Undo the clip that holds it in place, pull out, and plug both ends into the Dongar adapter.

The tricky part is arranging the wires and the adapter to fit nicely. It is possible to mount the USB connector to a flat spot in the housing with a bit of foam tape. The two thin wires that come from the adapter to the USB connector are very thin and are also really easy to get tangled up, so I suggest using the routing clip for the main wire bundle to secure those wires. Once you're happy with your wire arrangement, you should test the camera. Plug the camera into the USB cord and power on the car's electrical system (two presses of START without your foot on the brake). The camera should come alive on the second press. Make sure you can see a video signal. Once you're happy with the test, press the START button again to turn off the car. The camera should shut down with it.
You can do this test for the rear camera by plugging in the rear camera and repeating the test.
After testing the cameras and confirming that they work, it's time to button up the mirror housing. I routed the short USB cable that Dongar included down to the bottom of the housing and test fit both halves of the housing to make sure nothing would get in the way. I found it was easier to put the right (passenger) side of the housing up first, then the driver's side snapped right into place. The cable exits through a cutout at the bottom of the housing. It's possible to run the cable through the rearview mirror joint instead, but for these wedge shaped cameras, that's not an optimal route. Other cameras might work better that way.
Mounting the Front Camera
Clean your windshield with some glass cleaner and then wipe down with an alcohol pad. This should remove any gunk, grime, etc. Give a final wipe with a dry microfiber cloth to remove any condensation.
Make sure the temperature outdoors is at least 50 degrees F or higher, and the hotter the better to generate a solid bond. 3M adhesive likes it hot.
Make sure there's no condensation on the windshield! If you have a tinted windshield, mount the camera to the electrostatic sheet included with the camera.
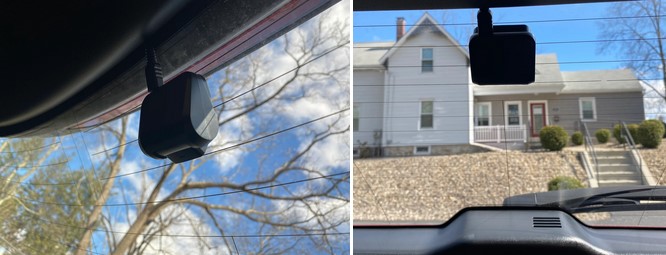
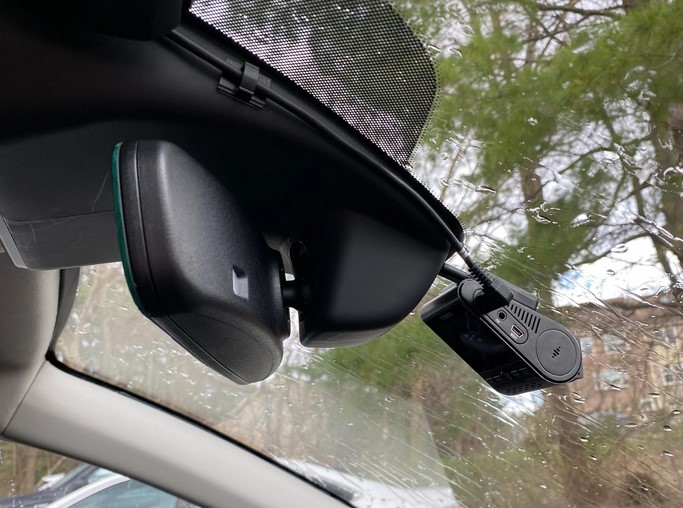
I mounted my camera using Viofo's GPS mount, which has the power cable attached to the "top" edge of the mount. If you're not using the GPS mount, power goes into the USB port on the right hand side of the camera. You might want to use a right-angle cord in that scenario.
The thickness of the cable's plug will affect how you mount the camera. I gave just enough slack that I could unplug the wire if needed without opening the mirror housing. Since the A129 camera itself can be disconnected from the mount without disturbing the cables, I figured having a minimal amount of cord would suffice.
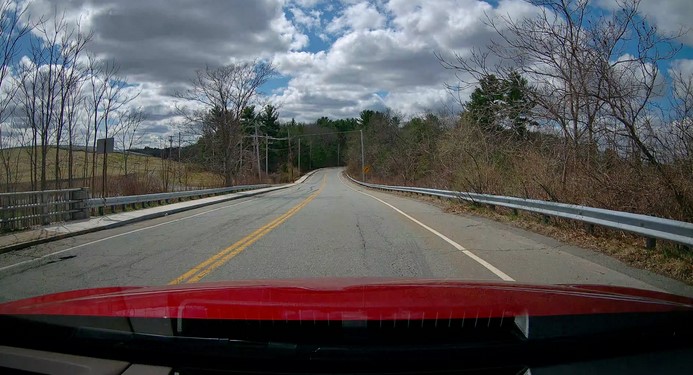
Before attaching the camera with adhesive, it's a good idea to do a positioning test. Power the camera and check your view using the camera's screen. If you're having trouble seeing the screen, use Wifi mode and your phone to act as a remote monitor. If you choose to mount under the mirror like I did, you can get a good picture with the right balance of hood/dashboard, road, and sky. You also want the image to be level relative to your hood and horizon. I've attached a sample image of my camera's view to show a good balance.
- I found that the sensor housing's bottom edge and center seam were good guides for positioning the camera. If you're having trouble checking the image, you can use a piece of blue tape to hold the camera in place while you check. Once you have a good idea of where you want to mount the camera, it's time to mount.
Give one final wipe of the glass with a clean microfiber towel.
Remove the red protective film on the adhesive pad.
Remove the white strip on the edge of the adhesive pad.
Firmly press the camera against the windshield and hold for thirty seconds. Then remove the camera from the mount by sliding it to the right, and press on the mount itself for another thirty seconds.
If you forgot to remove the white strip, don't worry. Get some dental floss, work it under that edge of the mount, and then pull out the white strip. It'll come right out if you work the floss underneath the strip's edge.
You can check the view from the outside to make sure you have all the adhesive touching the glass. Once that's done, it's time to start installing the rear camera.
Fishing the Rear Camera Wire
Before mounting the rear camera, plug it in to the main camera with its remote cord and make sure its getting a video signal. Use Wifi mode with your phone for an easier view.
NOTE: DO NOT USE REGULAR MINI-USB CORDS OR RIGHT ANGLE ADAPTERS! You must use the one supplied by Viofo because it has a proprietary 10 pin connector. It looks a lot like mini USB type B, but it's not. Both ends of the cable should have tags indicating which camera that end of the cable should plug into. The right angle plug is for the front camera and the straight plug is for the rear camera.
Before attaching the camera to the liftgate glass, you'll want to route the cable through the rubber cable conduit that connects the liftgate and the body. The first step is removing the top hatch trim using a pry tool or your fingers. It'll just pop right off with enough force as you pry against the metal clips that keeps it in place. If you're unsure, check out this point in this video.
To route the cable through the conduit, I initially referred to Arctic Hound's post here: Sep 3, 2020 about removing the grommets. But I found it difficult to reach the plastic grommet from under the head liner. So, like a dumbass, I unhooked the rubber tubes from the grommets. DO NOT DO THIS! It makes it so much harder. I spent an hour trying to reattach the rubber conduit until I gave up and figured out how to unclip the plastic grommet from the sheet metal. These things are more durable than they look, so don't be afraid to press in and squeeze the clips.
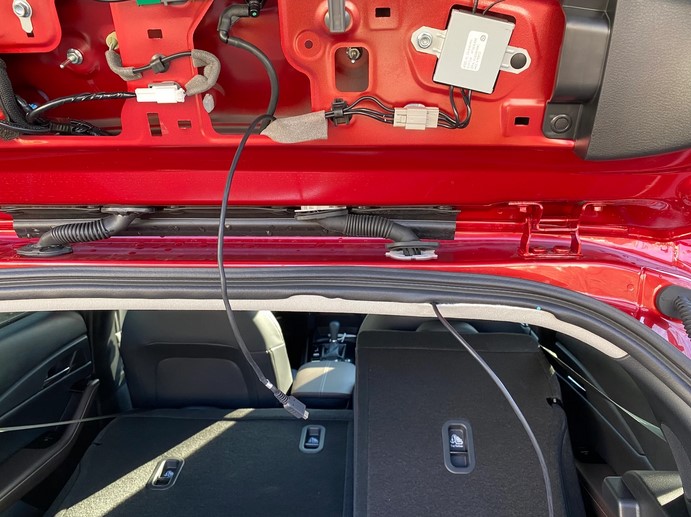
There's not a lot of room inside the tubing itself, and the Viofo cable's USB plug is kinda thick. Something like a thin rod or wire coat hanger really helps to fish it through. Use electrical tape on the ends so you don't cut anything, and run the rod through the rubber tube. Once the end of the rod is through the other side, tape the USB plug and cable to the rod, then pull the rest of the rod through the rubber tube. The cable should come along for the ride, after a bit of effort. You might need to help it out a bit by massaging it through the conduit.
Once the plug end is through the rubber conduit, you can pull the cable to the desired length. When the camera is mounted to the glass, there'll be very little visible cable. You want a little slack inside the liftgate to account for movement of the liftgate, but not so much that you're going to run out of cable to the front.
Mounting the Rear Camera
If you gave yourself the right amount of cable, you should now be able to mount the camera to the rear hatch glass. Viofo, in their infinite wisdom, put the power port on the back of the camera instead of the side. They also used a long, thick straight plug on the cable. This means that the camera can't mount as flush to the rear hatch trim as I would like. Nevertheless, you can still get a pretty close mount.
You'll want to mount the camera inbetween the defroster grid lines. I wound up using the second and third grid lines as a guide. The vertical grid in the middle of the glass is super helpful as a reference for centering the camera's position too. After a couple test fits I believe this spot is the best position for the Viofo rear camera. It's not the smallest rearview camera, but with the factory tinted hatch glass no one will ever see it.
I temporarily secured the camera with some blue painter's tape to do a test fit. While it's easier to attach the camera with the hatch open, it's easier to figure out WHERE to attach it with it closed. I folded down the rear seats, climbed into the rear hatch area, and used my phone as a remote monitor to confirm the image before committing to the 3M adhesive. The steps for affixing the rear camera are the same as the front camera.
Clean your hatch glass with some glass cleaner and then wipe down with an alcohol pad. This should remove any gunk, grime, etc. Give a final wipe with a dry microfiber cloth to remove any condensation.
Make sure the temperature outdoors is at least 50 degrees F or higher, and the hotter the better to generate a solid bond. 3M adhesive likes it hot.
Make sure there's no condensation on the windshield! If your rear hatch has aftermarket tint, you can use an electrostatic cling to attach the camera.
Give one final wipe of the glass with a clean microfiber towel.
Remove the red protective film on the adhesive pad.
Remove the white strip on the edge of the adhesive pad.
Firmly press the camera against the liftgate glass and hold for thirty seconds.
The adhesive pad has the same setup as the front camera—a piece of red film and a white strip below that. Don't forget to remove the white strip in addition to the red film! If you forgot, use the dental floss method above to remove it.
A final note: because of the steep rake of the hatch glass, some defroster grid lines will show in your video. They will be singificantly out of focus, but if you're picky like me you'll notice them. I was able to greatly minimize their appearance thanks to the position and lens angle I set. I've attached a sample here—by keeping the most obvious line in the top part of the frame, it'll blend in with the sky on most days.
Story’s Author
 United States of America, Massachusetts